Introduction
Contents
Welcome to boot camp! This will hopefully be one of the most instructive (and difficult) things you do while here at BYU. The goal of boot camp is to give students the mathematical and computational tools as well as the economic know how to make co-author level contributions on relevant, cutting-edge research projects.
This page will explain some of the administrative things boot campers should know in order to be successful during camp.
Submitting Assignments
We would like each of you to submit all your electronic (non-handwritten) assignments using git. We feel that learning git will help you keep your work organized and make it easier for you to collaborate with others on research in the future. If you don’t know or don’t remember how to use git email Spencer (spencerlyon2@gmail.com) and let him know – he is happy to help you. You can also look at the slides from the git/Sublime Text 2 presentation Chase and Spencer gave in March (you can find them here). It would be easiest for you to use bitbucket, but if you would like to keep your repository at another hosting service (github for example) there is no problem with that - however during this explanation I will just refer to bitbucket.
All of your Econ and Math homeworks should be typed up in LaTeX for submission. For the Math homework it has been decided that you can chooose 2 weeks where you will be allowed to submit hand-written homework (We obviously prefer that you don’t use these exceptions). Jeremy Bejarano has put together some short videos and references for learning LaTeX; you can find his website here (jeremylatex)
Setting Things Up
There are a few steps you need to follow to get things set up:
- Go to bitbucket.org and create an account if you haven’t done so already.
- Create a new, private repository on bitbucket (private is important). Name it something that makes sense. Perhaps your name and mclboot or something like that.
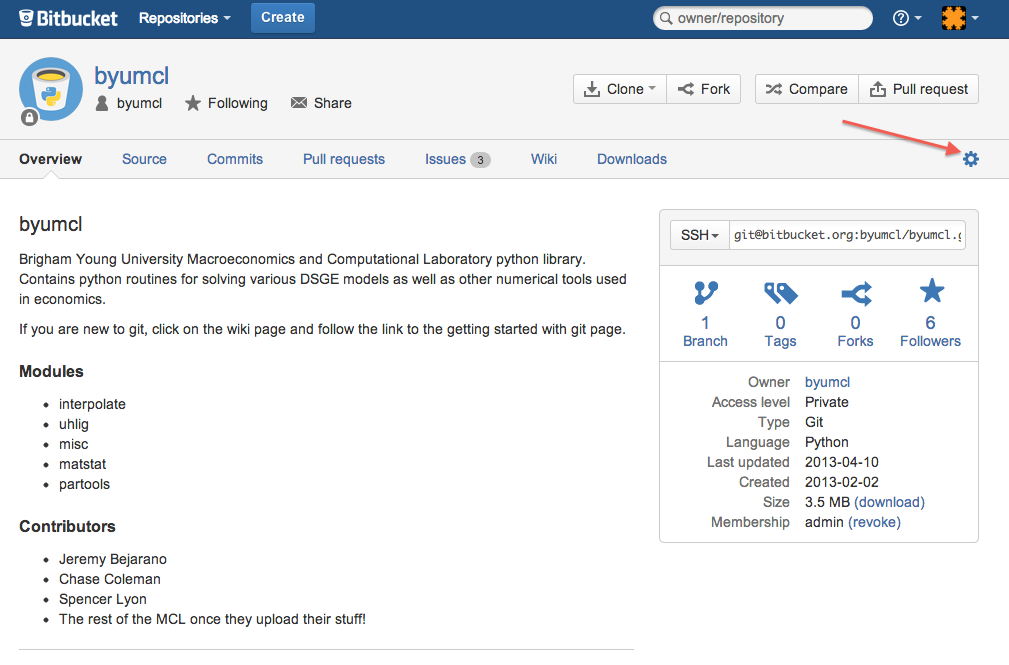
- Make sure you add the user spencerlyon2 to have admin access to the repository. You do this by clicking on the settings gear (cog) in the top right (See the picture below these steps). You should be taken to the repository settings page. Use the left toolbar to go to Access Management. A screen comes up that will allow you to add a user. Just type in spencerlyon2, make sure it says admin, and click Add. (Note I need admin access just in case another TA or teacher needs access to your work for some reason. If I have admin rights I can give them access without you having to worry about it, which will hopefully make your life easier.)
- Clone the repository to your local machine and you are good to go. (Note, if you haven’t set up ssh keys for your computer on bitbucket ask Spencer how to do it or just clone using https).

Organizing Your Work
We would like the repository for each student to be structured in a similar way. I will describe this organization below. Note that by / I mean to say the root or main folder in the repository, all folders have trailing slashes (Math/ means Folder named Math), and indentation represents items in a folder.
./
    Math/
        InnerProductSpaces/
            inner_prod.tex
        ConvexOptimization/
            convex_hx.tex
        ... More subject folders
    Econ/
        OLG/
            olg_1.py
            ... more olg assignments
        DSGE/
        Uhlig/
        Perturbation/
        Dynare/
        ... More subject folders
    Labs/
        labs1_6/
            lab_1.py
            lab_2.ipynb
            ... more .pys for labs given on day 1
        ... More lab days
The above is not an absolute requirement, think of it more as a suggestion for how you might want to do this. Feel free to find a system that works for you, but we do expect your work to be organized in some reasonable way. We do, however, request that you at least have 3 top level folders: one for Math, one for Econ, and one for Labs.
git Basics
After a brief explanation on how to move a git repository to your computer, we will explain how to work with git. We will discuss several basic commands including add, clone, commit, pull, push, and status.
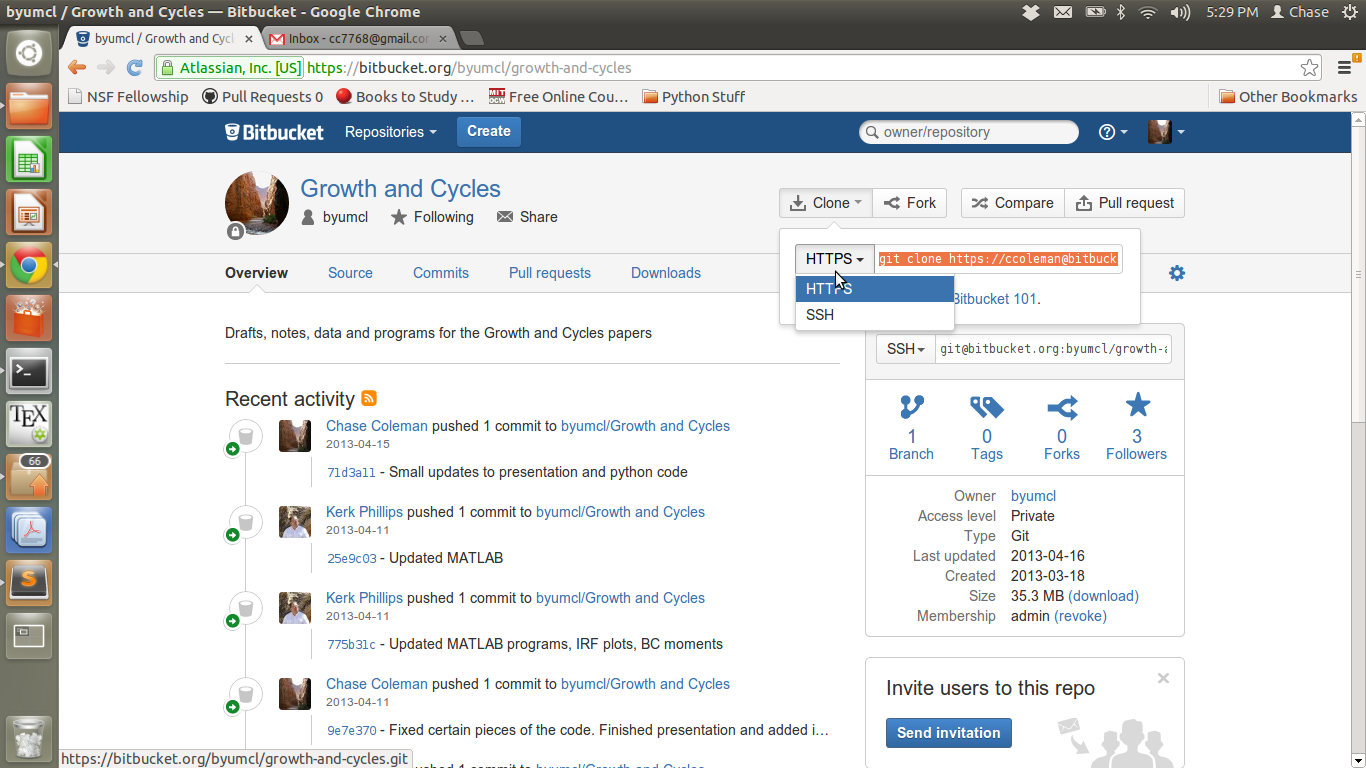
Before you are able to do anything else, you need to clone your git repository onto your computer. Cloning a git repository onto your computer takes all of the files that are stored remote and creates a folder on your computer with the same name as the repository that is linked to the remote version of the repository (These two versions will only communicate if you tell them to). To clone into the directory, find/create the repository online at bitbucket.org. It will take you to a page like this (The repository I am in is Growth-and-Cycles). Then, as you see below, click clone and copy the text in the box. Note: Only use SSH if you have already set up an SSH key (If you have questions about SSH keys ask one of the TAs) otherwise, use https.

Enter your terminal/git shell and cd into the folder that you want to house your repository (For me, under documents I would go to a folder called Research that houses all of my research repos). Remember when you clone it will create a new folder with the repository name, so if you cloned into research the file location would be /home/cc7768/Documents/Research. Once you are in that folder, just paste what you copied. It should say something like:
git clone https://username@bitbucket.org/byumcl/byumcl.git
Congratulations! You should have cloned into your first repository. If not, review instructions again or ask one of the TAs.
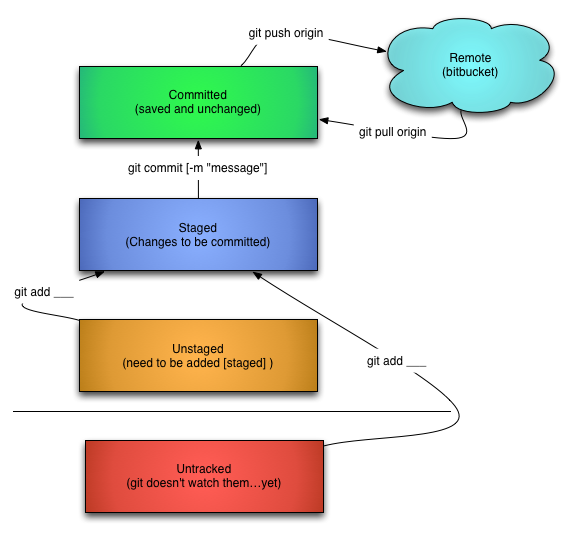
We will now use the picture below to explain the rest of how git works.

As you can see above there are several phases that files in git are seen as. The cloud up top is the remote repository i.e. bitbucket server where your files are stored. As you change/create your files on your computer, your files will become either tracked or untracked changes (If the file has been committed before then it will be a tracked change and if it is new to the repository then it will be an untracked change; as represented by bottom two boxes).
After any change that you make to files in your git repo, the next step is to stage that change for commit. This is done by the git add command (You need to use git add -A for untracked changes). Use git add <filename> to add the files that you want to be moved to the remote repo. Once you have git added these files then they become staged (2nd box from top).
Once your changes have become staged then it is helpful to use the git status command to make sure you have only staged the files that you want to commit. After you have verified that these are the files you want to keep then you can use the git commit command to save your changes as a commit on your computer (This moves them to the top box). After committing the files need to be moved to the remote repository so that others can have access to them. This is done by using the command git push. Your files have now been moved to the remote repository and your collaborators have access to your changes. To get the changes that have been made by your colleagues, all you do is type git pull and that will bring all the changes committed to your remote repository by others to your computer (If git push or git pull isn’t working then try using git push origin and git pull origin).
Suggested order for Work
Here is a suggested order of work for git.
git pull origin
This will pull all changes previously made and prevents you from making changes that were already made. After pulling the changes made by others then you can make the changes to the files that you need to work on. Then you need to stage them.
git add <files>
This will prepare the files to be committed.
git status
This command will tell you whether they are staged/unstaged/untracked or if your directory is current. This is useful because you want to make sure you are only committing files that you are ready to commit.
git commit
This will commit the changes that have been staged for commit. It is important to note that you can git add and git commit multiple commits before pushing and it is useful to split your commits into useful groups. For example, if you make a lot of progress on both code and latex files then you should try and commit the changes in two commits (One for the changes to the code and one for the latex files).
git push
Pushes the changes that you have made out to the remote repository for others to see.
Options
There are several options that you can include with your git add/commit command. I will list some of the basic ones because they turn out to be pretty useful.
git add <file>: This is the standard add. Adds a file
git add <directory>: This will stage all changes in <directory> for commit
git add -A: This adds untracked files to the commit
- git add -p: This begins a interactive staging session. The terminal presents you with a hunk of changes and prompt you for a command:
- y to stage
- n to ignore
- s to split into smaller hunks
- e to manually edit
- q to exit
git add .: Stages ALL files (both tracked and untracked)
git add *: Stages all tracked changes
git commit -m '__': In the quotations you should put your commit message. Easier than being moved to VIM to upload a message describing your commit.
git commit -am '__': Same thing as writing git add * and then git commit -m '___' (adds and commits files)
For more information refer to the presentation here, gitref.org, or gitbook.
Installing Python
There are many ways to install python; here we will cover a few of them. We would like to emphasize that the python 2.7 line is more commonly used in scientific applications than the 3.x line. This is due to some internal changes within python 3.x that broke backwards compatibility (some 2.x code doesn’t run in 3.x). Many scientific packages work on both 2.x and 3.x, but some do not. To avoid any potential issues, we recommend using python 2.7.x as your main python.
Building From Source
You can build your python distribution completely from source. This option provides the most flexibility, but is also the most difficult. If you aren’t used to lower-level computer tasks, you should probably move to a different option.
To build from source you would download a fresh copy of python from the main python website. Again as noted above, we recommend using python 2.7.x instead of python 3.x.
After installing python you will need to install various pacakges. At a very minimum, for bootcamp you will need to install numpy, scipy, and matplotlib.
Other packages can be installed from the command line via easy_install. For example, if you wanted to install pandas, you would do easy_install pandas from the unix terminal or windows command prompt.
Using a Scientific Distribution
Because the scientific python community is so active, there are a number of pre-compiled distributions that already contain many scientific packages. This is much easier than building from source and will result in a stable scientific python distribution you can customize or extend however you see fit.
Although there are many distributions available, we would recommend using either the anaconda python distribution or Enthought canopy. Both of these distributions will provide the basics like numpy, scipy, matplotlib, and sympy. However, the emphasis for what each package does is different, as evidenced in the extra packages they bring with it.
anaconda is build for science and data analysis. Over 50 of the most useful scientific packages come with anaonda, including some that are only available in anaconda. canopy is a more well-rounded distribution. There are over 100 packages included with canopy, including the main scientific ones. What you get with canopy, as opposed to anaconda, is a great platform for general python programming or application building - with the ability to do scientific work. At the end of the day, they are both great options that I (Spencer) use regularly.
It is important to emphasize that both canopy and anaconda provide free and commercial versions of their distributions. The commercial distributions contain more packages and optimized versions of some standard ones (like numpy and scipy). As an academic user, you have free access to the commercial version as long as you register with your @byu.edu email account. We highly recommend doing this.
Installing MatLab Tools
During bootcamp you will need to have access to a working version of MatLab. All the machines in the lab in 116 FOB will have MatLab installed. If you would like MatLab on a personal computer and don’t already have it talk to Rick Evans or Kerk Phillips.
In addition to MatLab you will need to install the free MatLab addition Dynare. It is a set of tools that allow you to solve economic models with limited a programming investment. Dynare will be used during week 3 of bootcamp, but we just wanted to make you aware of this requirement up front.